Click HERE to return to the contents page
VI. INVENTORY
[Time: 145:21 min.] [Time: 46:30 min.]In addition we will discuss some of the configuration choices that set default for Item Master Data.
at the steps involved in not only
creating these items, but how they are managed then they are received into
inventory and when they are issued out of memory.
Setting up items: Business
Example Each individual laptop or computer has a
Serial Number so that you can easily track sales and service for that particular
laptop or computer. Other items, such printer cartridges, are
purchased in lots and are managed by batches in order to track expiration dates. SAP Business One enables you to manage
all the items that you purchase, manufacture, sell, or keep in stock. The way we define what these items are
and how they are handled is through the Item Master Data Record. An Item Master Data Record is created for
each product and identified with a unique code. Item Master Data is at the heart
of almost every process in SAP Business One. It is controls how the item acts in
the sales, purchasing, production, MRP, inventory, and service modules. An Item Master Data Record stores
essential information such as if the item is purchased or sold, the price of the
item, the inventory level, and how purchasing of the item is Forecast and
planned. This data is used automatically by the
system in the processes for purchasing, sales, production, managing your
warehouse, and accounting. Items used in an
accounting or inventory transaction cannot be deleted (such as A/P or A/R
Invoice, Journal Entry and so on), it cannot be deleted. But what about obsolete items? Perhaps you no longer wish to
sell a particular model of monitor, but since it has stocked and sold in the
past you cannot delete it. What can you do? Instead you can mark the item as inactive so it can no longer
be added to Sales Orders. The inactive checkbox can also be used for products
that are not yet ready for sales and purchasing transactions. You can choose to
exclude these inactive from system reports. Lather is possible to delete them
completely [from database]. Structure of the Item Master Record
Like other types of Master Data, such as the Business Partner,
the header and the tabs. The header contains general information about the item.
A unique ID number must assigned as the code. The header is also where you can
assign multiple item categories. The tabs contain more detailed information for processing the
item. Now I will demonstrate how to create item. I will create an
Item Master Record for one of our new products, a photo scanner. Inventory > Item Master Data, Add mode. Then I enter the
values for my new photo scanner: Item Number and Description. The item categories of the master determinate how the item is
used in the various modules. ... checkboxes control whether an item is kept in
inventory, offered for sale or purchase, and whether the item is a fixed asset. I need to select an Item Group I just created. This will bring
in the defaults from the Item Group. Now I need to fill in information specific to the business
processes that use this item. 
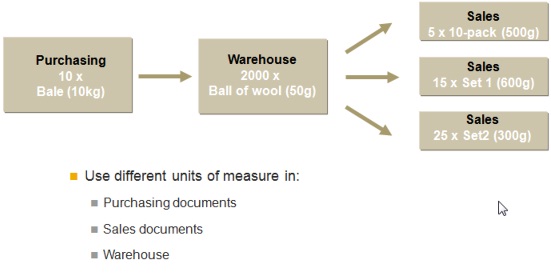
I choose the Purchasing Data tab page to enter data that is
important for purchasing the item such as the vendor and some specific
information on item dimensions. Purchasing Data tab also includes information on
how to indentify the item in a manufacturer's catalog, units of measurement for
purchasing, and actual dimensions for the item. Before I switch to the Sales Data tab, I can choose to
Copy
the item measurement to the Sales Data tab. (Click Copy Units to Sales Data
arrows >>) Sales Data tab is similar to Purchasing. It contains units of
measurement for sales, packaging and other parameters to determine how an item
is handled. The Inventory Data tab contains details on how the item will
be stored in inventory and how the item costs are determined. The Planning tab is used for Planning and Producing an item
using Materials Requirements Planning (MRP). ... we see that the Planning Method
has defaulted to MRP which means that item will be included in MRP runs. We also
see that the procurement method has defaulted to buy. Additional details on the tab specify how the Lead Time which
indicates how long it takes to obtain or produce the item. The item properties tab allows us to classify the item with up
to 64 different properties which we can use for reporting and even for
determining pricing. I could also enter a text about this item or a photo in the
Remarks tab. This is a new item which is only in the planning stage, so I
do not want anyone to use it on a Sales Order or Purchase Order at this point. I can mark the item as Inactive. This way it cannot be used on
marketing documents until it is time. Inventory Data tab and Stock Levels
The inventory data tab of the Item Master Record shows us
up-to-date information On Stock levels and demand for the item for each
warehouse. This information is updated dynamically so shows a true picture at
any time. The quantity in Stock. Here's an important formula to memorize: The Available
quantity is calculated as the In Stock quantity minus the Committed quantity
plus the Ordered quantity. Viewing and discussing the Inventory Data tab for an item with
many stock transactions. Let us take a look at a product that has been in the system
awhile so that we can see the inventory tracking information which appears in
the Item Master Record. On the Inventory Data tab, I can view the quantities in the
columns for the main warehouse. In Stock - is the quantity currently in inventory for this
warehouse. Available quantity = In stock - Committed + Ordered Since this item is Available in multiple warehouse, I can view
stock information for each warehouse. The default warehouse is used in any transaction where a
warehouse is not specified. You can set minimum, maximum, and required quantities for the
item either at the item or warehouse level. We see here that this item is
managed at the warehouse level. This item is controlled [Valuation Method] by Moving Average. The Unit Cost is the total value divided by quantity on hand. Item Master: Grouping Criteria Item Type Most businesses by and sell a large number of items. So, it
become very important to group these items logically. You can group items several ways: by Item Type, Item
Properties, Manufacturer, and Item Group. Some of the options can additionally be used for accounting or
pricing functions. 
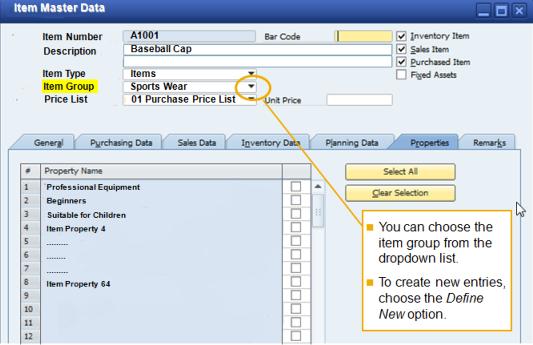
Item Groups are very easy to use, because the group is chosen
in the header area of the Item Master Record. On key setting you can make at the Item Group level is the
inventory Valuation Method. 
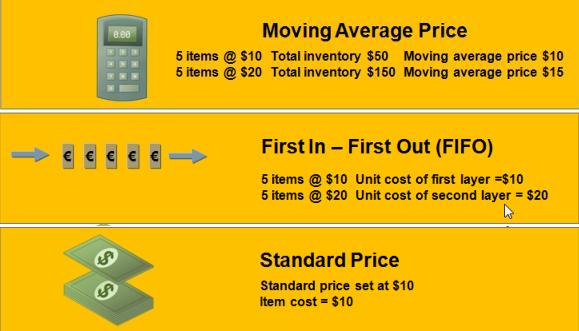
Moving Average Price When you create a new item, you can leave the default
Valuation Method that comes from the Item Group or you can change it for that
particular item. Valuation Methods are basically formulas for how you determine
the cost of the units that you sell. These formulas control the inventory cost
of an item if you are using Perpetual Inventory.
We will cover Valuation Methods in detail later in the
e-learning on Inventory Accounting. However, let us take a quick look at how
each method works. Moving Average The system calculates the
Moving Average price by dividing the total value of the goods by quantity in
stock. For example, let us say you buy 5 items for 10$ each. You have 5 items
worth 50$. The Moving Average is 10$. Then you spend 100$ to buy another 5 items
for 20$. Total inventory value is now $150 and you have a quantity 10 in stock.
Therefore, the total value of the goods divided by the quantity in stock gives
us a Moving Average price of 15$. The Moving Average price is used as the item cost when this
item is sold or otherwise issued from the warehouse. FIFO Method, the system calculates the item
cost as the cost of the oldest unit on hand. The theory behind this Valuation
Method is the same as the name: first in, first out. The first items received
into stock are the first items to be issued. This is a useful method if you have
inventory items with expiration dates. You want to sell the items before the
expiration date, so you always sell the oldest items first. The system stores each Good Receipt in the Inventory in a
separat layer. When you post any good issue, such as when you sell an item, the
system uses the price from the oldest layer, from the second-oldest, and so on. Let us say you buy a quantity of 5 at 10$ each. The unit cost
of the first layer is 10$ each. You then buy a second quantity of 5 at 20$ each.
The oldest layer's cost remains 10$. However, you also now have a newer layer
with an unit cost of 20$. When you sell the item, the system uses the oldest
layer first. So the first quantity of 5 sold has a item cost of 10$. Standard Price option, you manually enter a
fixed price into the Item Master Record. The system uses this price for all
stock movements. This is a logical method to use for items which you produce
in-house. An example: You set the Standard Price at 10$. Therefore, when an item is received into stock it is valued at 10$. When it is sold, the item cost
remains 10$. Setting a Standard Price is like a making a royal decree. You
decide what the item is worth. You specify the unit cost. The item cost always
equals the Standard Price set in the Item Master Record. Once you set the
Standard Price at 10$, the unit cost remains 10$. If you buy this item for 11$, the 1$ difference is posted to a Variance Account and the item cost remains 10$. It is possible to adjust a Standard Price item's cost through inventory revaluation on a periodic basis. We will create an Item Group and see how the Item Group
settings default into new Item Master Data Record. We will look at the default values that can be set at the Item
Group level and what can be changed at the item level. We decided to purchase and sell a new product line: smart
phones. First let us check if an Item Group has been set up for smart phones. Administration > Setup > Inventory > Items Groups No group currently exists, so I create a new group for smart
phones. The Item Group contains defaults for planning method,
procurement method, order interval, order multiple, lead time, cycle group, and
Valuation Method. Out company buys the smart phones for resale so the
procurement method should be set for purchasing. We do not plan to use MRP for his product so we will set the
planning method as non-MRP. Since this is a product we purchase and the price may vary, I
will choose Moving Average price as the Valuation Method. I will set the lead time to 4 days since that is the average
for our smart phones. When I create an Item Master Record and link it to the Item
Group for smart phones, we will see these defaults in the new item. Inventory > Item Master Data to create an item master
for the first of the smart phones. I make sure that I am in Add mode. I will select the Item
Group we just created. This will bring in the defaults from the Item Group. Let us take a look at some of the values that defaulted in
from our Item Group for smart phones. Inventory data tab. Here you can see the default Valuation
Method is Moving Average. Notice that you cannot enter an item cost here because
the field is grayed out [in table]. If I choose Standard Cost, then this
fields opens for entry. Planning tab. ... is used for planning and producing
an item using Material Requirements Planning (MRP). ... we see that planning
method has default to not use MRP and that the procurement method has defaulted
to buy. The lead time has defaulted to 4 days. All these were values
defaulting from the Item Group. Since this item comes from a vendor that has a
very close relationship with us, we think the standard lead time could be
shortened, so I will change that value to 2 days. In SAP Business One, each item is associated with at least one
warehouse, the main warehouse for that item. The item can also be stocked in
additional warehouse. Inventory quantities are tracked for item in each
warehouse where it stocked. Monetary value of the inventory quantity is also
tracked. 
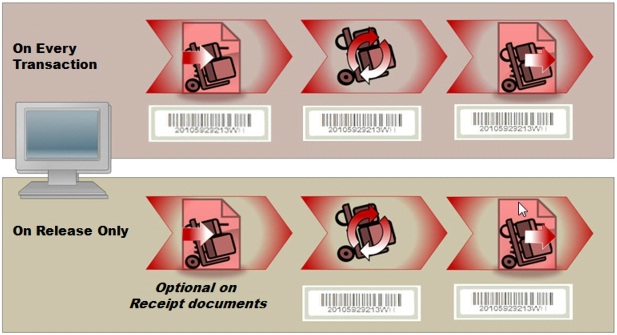
If you are using Perpetual Inventory, anytime an item enters
or leaves a warehouse, it has a financial impact. You have seen this effect in purchasing and sales. 
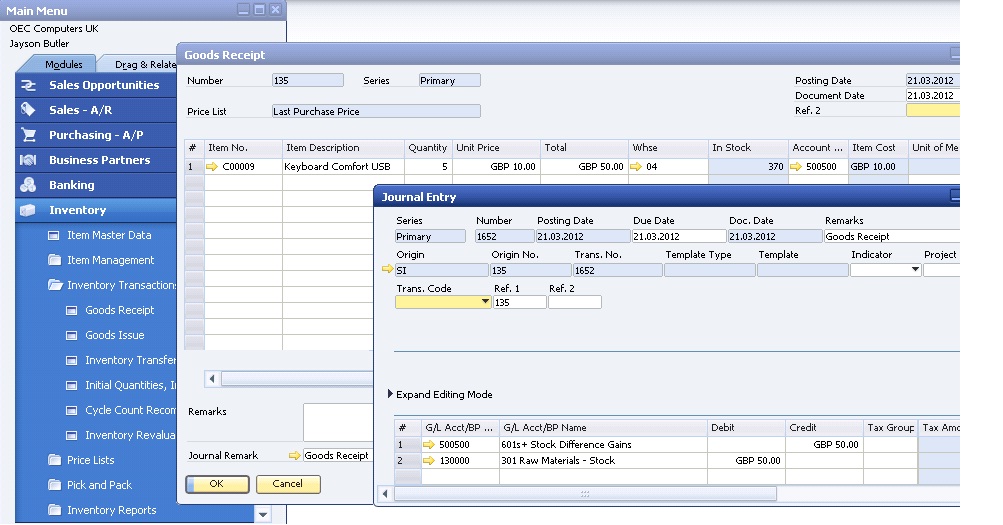
When you create a Goods Receipt PO or a Delivery, the system
posts a Journal Entry to reflect the costs associated with the change in
inventory. So, how does the system know witch accounts should be used for the
posting? - Set up accounts and G/L Account Determination default for
Company The system takes the accounts according to the "Set G/L
Account by" setting in the Item Master Data. So how do you
define the account to be used? When you first set up a company, you
define accounts and set up account determination defaults in Administration
Menu. These values are defaulted to any warehouse or Item Group you
create. When you create an Item Master Record, the G/L Account Determination
level defaults from the company setup. You can change the level for G/L Account
Determination for the item. The accounts can be determined by the Warehouse, he
Item Group or be set directly in the item itself. By setting G/L Account Determination, you influence
accounting and financials reporting by choosing the appropriate level at which
to maintain accounts for Perpetual Inventory. The Perpetual Inventory is then
managed at that level automatically by the system whenever your enter a
transaction that would affect stock levels.
You have three options on how you maintain G/L Account
Determination for an item: at the item level, at the warehouse level or at the
Item Group level. The system defaults a set of inventory accounts into the item
master as they were defined in the a company's G/L Account Determination. If you
choose to maintain accounts at the item level, you can change these accounts for
a particular item directly in the Item Master Record. This allows you a great
amount control, but requires a lot of maintenance. The other methods allow you to simplify the process. If you want to track and manage costs by manufacturing or
distribution plant locations within your company or by types of stock, then you
might set
Items can be marked inactive
The Committed quantity, which is the quantity ordered by customers.
The Ordered quantity, which represents either quantity ordered for Purchase by
your company but not yet delivered or the quantity on Production Orders for item
produced in-house.
Finally, it shows the available quantity, which is the quantity available for
your Sales Orders.
Committed is the quantity on pending Sales Order.
Ordered is the amount we expect to come in to replenish stock.
Item Properties
Manufacturer
Item Group
You can even create new Item Groups in the dropdown by using the Define New
option.
First In - First Out (FIFO)
Standard Price
- Value default to warehouse and Item Groups
- G/L Account Determination level defaults to item
The same item would have costs posted to different accounts depending on which warehouse it was received into or issued from.
On the other hand, if you want to track an report on costs by product line, you have the option to set different accounts by Item Group. When you choose to use the Item Group level, the system automatically retrieves the accounts from the Item Group definition.
Demo - Account Determination for Items
I will demonstrate settings up G/L Account Determination.
Administration > System Initialization > General Settings > Inventory tab
Administration > Setup > Financials > G/L Account Determination > Inventory tab: Inventory Account. [This account is copy automatically in New warehouse or New Item Group].
Administration > Setup > Inventory > Warehouses > Accounting tab: Inventory Account
[For appear Inventory Account from Item Group in Item Master Data is need to set up Item Group correctly].
Use different units of measure in:
- Purchasing Documents
- Sales Documents
- Warehouse
The Item Master Record also holds the Unit of Measure
Different units of measure can be used in purchasing, sales and warehouse documents.
You can even define a standard unit of measure for sales and a different standard unit measure for purchasing inside the Item Master Record.
A unit of measure has two parts: a text field and items pe unit.
Beginning with 8.8 release, the standard units of measure can be changed even when transactions exist.
You can overwrite the unit of measure and the items per unit in marketing documents as needed. For example, you usually buy from a vendor who delivers an item in cartons, each carton contains 12 units. However, you are trying out a new vendor who will supply the item in crates. Each crate contains 20 units. Since the purchasing unit of measure is a carton, the unit measure in the Purchase Order defaults in as a carton. You can override this value and change the unit of measure and the items pe purchase unit to create in the Purchase Order without affecting the Item Master Record.
If the change is permanent, you can also make the same change in the Item Master Data Record.
Now I will demonstrate how to work with units of measure.
Management has decided to change how a slow-selling item is packaged an sold. Previously, the item was sold in cartons, but from now on, the item will be sold in a new unit of measure the "packet". Fortunately, it is possible from the 8.8 version, to change the unit of measure in the item master record even though transactions already exists in the system.
Change the sales unit of measure for the item from carton to packet. Change the Items per purchase unit to different quantity.
Show the log of change (Tools > Change log).
Serial Numbers can help you track items down to the level of each individual object in your warehouse, so you know exactly which one was sold to a customer. Serial Numbers are also very useful as way to track service history for a customer's purchase.
Here are two criteria that can be used to decide if an item
should be serialized:
- Is the item a high value item?
- Should the item be tracked for security or repair reasons?
If the answer to both questions is yes, then the item is a good candidate for Serial Numbers.
In contrast, batches are used to track a quantity of an item with characteristics in common. The characteristics might be attributes you define such as shade of color, granularity or PH balance.
Characteristics could be dates, such as expiration dates, manufacturing date, or date the items were received into inventory.
A good example of batch-managed item would be milk. Each batch of milk has a sell-by date. It is very important to track this date and make sure the milk is sold before its expiration date.
You have the option to set the Serial Numbers or batch numbers to be assigned on every transaction or to be assigned on release only.
If you choose "on every transaction" then you must assign Serial Number attributes for every single unit at the first point it enter inventory. Thereafter, the system will prompt your for a Serial Number on every transaction where the item is issued out of inventory or returned to inventory. This way you know exactly which objects are in inventory and which objects have been shipped to a customer.
This method is useful when you need to track the individual objects at all times, and where the receiving personnel have the appropriate information at the time the units are received.
When you first receive the serialized items into stock, you can choose the option to enter Serial Numbers manually or to create serial numbers automatically using a Serial Number string of your choice
"On Release Only" means that Serial Numbers are only required on documents that issue an item out a warehouse.
Release documents not only include: Goods Issue, Delivery, A/R Invoices and Goods Issue to Production, but also inventory transfers between warehouses and return and credit documents.
When you use "On Release Only" at the time of purchase, there is no need to enter Serial Number attributes.
However, when you remove the item from inventory, the serial numbers for these objects must be created first using the Serial Item Management window.
An alternate option is to choose "automatic Serial Numbering creation on receipt".
When you purchase the serialized item, the system automatically creates succesive numerical Serial Numbers for the quantity you have purchased. With this option, you can immediately release these objects without further operations.
You can update the Serial Number attributes at a later stage, using the Serial Item Management window.
This is especially useful when a large quantity is produced or purchased.
Why might your choose "on release only"?
One example might be if you manufacture an item and would like to issue it into inventory without a Serial Number. This way, you can wait to assign the Serial Number until item is picked for delivery. "Release Only" gives you the flexibility to not worry about Serial Numbers inside the warehouse.
Demo - Settings up Serial Numbers
In this demonstration on setting up Serial Numbers, I will create, receive, and sell a serialized item.
We have a new product that we resell: a laptop computer. This item will be managed by Serial Numbers.
View the item master to see how Serial Number management is set up.
Then when you choose "On release only", you get an additional option for automatic numbering. This choose enables the system to automatically assign a sequential Serial Number for each item received.
Every Serial Number gets an internal number, but with the automatic option, this number is assigned without any other attributes.
The big advantage of the internal numbers is that you have a way to uniquely indentify each unit for the item without having to enter any Serial Number details when you receive the item into inventory. This is very helpful when you are receiving a delivery with a large number of objects.
I receive a Delivery from vendor for the laptop computers, so I will create a Goods Receipt PO.
Purchasing A/P > Goods Receipt PO
I add the items to receive them into inventory. Notice that I did not have to specify Serial Numbers at this point.
Later on we are ready to enter the Serial Number details for the recent purchase.
Inventory > Item Management > Serial Numbers > Serial Numbers Management
I enter my item number and choose Goods Receipt PO to update the information for the Goods Receipt. Choose OK.
The system number field shows me the automatic Serial Numbers assigned. I choose Global Update.
I choose the Browse Button <> for the Serial Number field to update Serial Number with patterned string.
In the Serial Number Global Update window, I choose Update. I can see the assigned Serial Numbers and they look correct, so I can choose Update again.
A customer wants to 2 of the laptops shipped out right away so we create a delivery.
The Serial Number selection window will open automatically as I save the Delivery.
I choose two Serial Numbers representing the items picked from the list and move them to the right.
Let us take a look at the Serial Number transactions report.
Inventory > Inventory Reports > Serial Number Transactions Report
Now we can see the Serial Number details for each object and the transactions moving the object in add out of the warehouse.
The configuration for Serial Numbers is located in:
Administration > System Initialization > General Settings on the Inventory tab. Here you can set the default for what will appear when you choose to have an item managed by Serial Numbers.
If you wish to choose to set Automatic numbering option as
the default, as I demoed, then you need choose On Release Only. Also note that
if you want the option to add an external Serial Number as well as the
internally assigned one, then you need to ensure that the option for unique
Serial Numbers is not set.
Imagine that: You company has multiple warehouses to manage your regional shipping.
Whenever you open up a new region for sales, you add a new warehouse to your distribution network.
You move stock between warehouses to better manage inventory availability.
In the purchasing process, you receive items into a warehouse with a Goods Receipt PO. You also receive items from Production Order.
Occasionally you need to issue items for samples to your sales staff and periodically you need to discard damaged items.
For all these transactions outside of purchasing, sales and production, you use warehouse management documents.
There are three documents used in warehouse management:
Goods Receipt
Inventory Transfer
Goods Issue
Goods Receipts are used to enter items into warehouse. This is the document you use when you are not using marketing documents in logistics that can be used to receive items into the warehouse, such as the Goods Receipt PO in purchasing or the Return document in sales.
Inventory Transfers are used to move items between warehouses.
Goods issues are used to move items out of warehouses.
Inventory Goods Issue and Goods Receipt documents are typically used when there is no sales or purchasing process involved in the Goods
movement, for example, receiving samples or scrapping damaged goods.All three of these documents are created with reference to a warehouse. Before we look out how the documents are used, let us look at how you define a warehouse in SAP Business One. The first step is defining a warehouse is to enter a Warehouse code and a Warehouse name. Then you need to specify where the warehouse is by entering location and address information.
Most warehouses are created for physically storing items, but a warehouse can also be set up as virtual warehouse to manage business processes where goods are shipped directly to your customers from one of your vendors. We call this a drop ship warehouse.
Because there is a monetary value to your inventory, you also need to specify accounts that are used for inventory management.
Accounts default automatically from G/L Account Determination setup, but you can change the accounts on the Accounting tab.
Additionally, you specify whether a warehouse will appear in the Material Requirements Planning (MRP) as default. When you initialize the company, you can choose one of the warehouses as the default warehouse. You can override the default warehouse in the Item Master Data as needed.
We have decided to add a new warehouse for our company since we have expanded you sales into new region.
Administration > Setup > Inventory > Warehouses.
We will give our new warehouse the code 07 because it is our seventh warehouse and we will call it the Southwest Regional Warehouse. Then I will enter location an address information on the General tab page. Since we do not have location set up yet, will define a new location for our warehouse to represent this area.
In the warehouse window, we see the option for drop ship. We will leave this option unchecked we plan to physically store items in our warehouse. The drop ship process is when you sell items to your customers that you do not actually carry in stock. No inventory or accounting transaction is recorded when you use the drop ship warehouse. In those cases, you take a commission on the items which are then shipped directly from your vendor directly to your customer.
Another option in setting up the warehouse is to mark the warehouse "Nettable". When you check this box, the warehouse will appear as a default option in the Materials Requirements Planning process (also known as MRP). Even if you do not mark the warehouse as "nettable", you can still choose the warehouse in MRP.
These fields appear for warehouses regardless of the localization you are running. Depending on your localization you may see additional fields.
Now we choose the Accounting tab to view the default G/L Accounts assigned to the warehouse.
These accounts were set up as a default for warehouse and Item Groups within our company and default automatically into any new warehouse we create.
We can change these accounts for this warehouse if we choose. We have finished entering the information for our warehouse.
Now we we're added the new warehouse, we will take a quick look at the transaction where the default G/L Accounts Determination was set up.
Administration > Setup > Financials > G/L Account Determination > Inventory tab.
These are the accounts that defaulted into the warehouse we just created.
Recently, we make a mistake creating a warehouse, so we would like to remove that warehouse from the system. Warehouse can be removed if they are not used or if you made a mistake setting one up. A warehouse can be removed even if it is linked to items; however it cannot be removed if it is used in a Bill of Materials or if there are transactions posted against it.
The remove process is irreversible so you will want to make sure you are removing the correct warehouse.
Administration > Setup > Inventory > Warehouses.
We switch to Find mode.
We type in the Code 55.
This graphic shows on overview of the different possibilities of stock movements, including the stock movements initiated from purchasing, production, and sales documents. We focus on the boxes in blue in this e-learning.
Good Receipt documents are used for receiving inventory that is not purchased or produced.
One example might be to adjust quantities after a physical inventory has taken place and you have discovered that part of the quantity was not included.
Beginning quantities can be used when you first start up new SAP Business One company and you are bringing over stock from your legacy system.
However, many customers prefer to use Goods Receipt to enter their beginning quantities, since it provides a better audit trail for the transaction.
Inventory Transfer are used to move between warehouses.
Goods Issues can be useful for cases where items are damaged, perhaps by flood in warehouse. If water damage renders them unless and unable to sell, they are removed from the warehouse.
The Goods Receipt and Goods Issue window are very similar. Both documents require you to enter warehouse affected. If you do not specify a warehouse, the system will use the default warehouse from the item master record.
Unlike marketing documents used in the sales and purchasing processes, you cannot enter a Business Partner.
On difference between the two documents: Goods Receipts allow you enter the price of item entering warehouse.
Goods Issue, on the other hand, use the item cost to calculate the value of the accounting transaction and the price field is for informational purposes only.
A Goods Receipt creates a Journal Entry that posts the value of the received goods on the debit side of the [301] Stock Account and the credit side of the [601]Inventory Offset - increase account.
A Goods Issue a Journal Entry that posts the value of the issued Goods on the debit side of the [601] Inventory Offset - decrease account and the credit side of the [301] Stock account.
The Stock Accounts are retrieved from the [301] Inventory Account fields on the Inventory Data tab of the Item Master Record.
A field in the Item Master Record determines whether these accounts have defaulted in from the warehouse or Item Group or whether they were entered directly in the item master itself.
We create a Goods Receipt to receive them into the new warehouse.
Inventory > Inventory Transactions > Goods Receipt
Goods Receipt window opens. We enter the item number, quantity and warehouse into document.
The price shown defaults from the Price List that is chosen for the document. You can change the Price List by using the drop down (Show options). Note that the price used is important because it affects the unit cost of the item.
Now let us go back to our document and see the Inventory posting that was made since we are using Perpetual Inventory management. We open the last document created and choose the link arrow for the Journal Entry.
See the value of inventory added to the warehouse. This value is based on the price for this item entered in the Goods Receipt.
One of the salesman is anxious to show up this upgraded item at a trade show. So, we will Goods Issue two of the Items out of the warehouse for him to use demonstration.
We create Goods Issue from the warehouse for this item.
Inventory > Inventory Transactions > Goods Issue
The Goods Issue window opens. We enter the item with a quantity of two for our new warehouse 07. We add a remark to the document.
Now let us go back to our Goods Issue document and see the Inventory posting that was made since we are using Perpetual Inventory management.
See the value of Inventory removed from the warehouse. This value is based on the item cost for this item.
When you have multiple warehouses, you might need to transfer
inventory from one warehouse to another. Here's an example.
A Sales Order has just come in for 5 pieces of an item. Warehouse 01 has 4 pieces and the fifth piece is located in warehouse 02. We can transfer the one piece from warehouse 02 to warehouse 01, so that all the items can be delivered from one warehouse. When you add an Inventory Transfer from warehouse 02 to warehouse 01, the system posts a Journal Entry.
The Journal Entry posts the value of the transferred goods on the debit side of the [301] Stock Account of warehouse 01 and the credit side of the Inventory Account of warehouse 02.
As with the Goods Receipt an the Goods Issue, the [301] Inventory Accounts are retrieved from the [301] Inventory Account fields on the Inventory Data tab of the Item Master Record.
Demo -
Transferring InventoryWe will transfer some stock from our main warehouse to our new Southwest regional warehouse.
Inventory > Inventory Transactions > Inventory Transfer.
We need to enter the source warehouse and the destination
warehouse as well as the item and quantity transferred. We enter 01 for our main
warehouse in the From Warehouse field. Then we enter the item number (C00010).
We enter our new warehouse 02 as the destination. Finally we enter a quantity
10.
We can double-check the Quantity Available in Warehouse 01 by putting the
cursor in the To Warehouse field and choosing Ctrl + Tab. Everything looks good.
Now let us go back to our inventory transfer document and see the inventory posting that was made since we are using Perpetual Inventory management. We open the last document created and choose the link arrow for the Journal Entry.
See the value of inventory removed from warehouse 01 and the value of the inventory added to the warehouse 02. This value is based on item cost.
There are a number of useful warehouse reports.
The Item List provides a list of items with relevant prices according to Price Lists stored in the system. You can see an overview of all items or choose just selected items to display. Use this report to check and compare the item's prices. You can print out Price Lists to send your customers.
The Inventory Posting List provides an overview of all postings in the system.
You can use select criteria such as: Items, Business Partners, Warehouse and sales employees to narrow the display. The report shows items and cumulative quantities, as well as the prices that were entered in documents. This report shows items and cumulative quantities, as well as the prices that were entered in documents.
The Inventory Status provides an overview of the current stock situation an information on planned receipts an withdrawals. This information is now also accessible from within documents in the available to promise report as well as through the inventory menu. Use this report to analize the activity of a certain item and its current stock status.
The Inventory in Warehouse Report lists the current inventory by Warehouse based on all the documents used in Logistics to receive and Issue Stock. You can view In Stock, Committed, Ordered, and Available quantities. The information from this report can then be used to determine whether there is a need to move items between warehouses, for example, to supplement a warehouse with lower stock totals. There are two versions of the report: normal or detailed.
The Inventory Audit Report tracks all the receipts and releases of items by cost and calculates the overall value of your inventory. You can summarize the report by account or by item. This way you can compare the total monetary value of your inventory accounts to a detailed view item and identify any discrepancies.
The Inventory Valuation Simulation Report is intended to be used by management to check what-if scenarios. Be selecting a different inventory valuation methods then one you currently use, you can analyze what you inventory value would be if you were using that valuation method. For companies using non-Perpetual Inventory, the report is named Inventory Valuation Report.
We've transferred some stock into our new warehouse so we'd like to check the current stock levels. We can run the Inventory in Warehouse Report.
Inventory > Inventory Reports > Inventory in Warehouse Report.
We would like to look at our new warehouse so we choose the by Warehouse tab. And then enter Warehouse 02.
[Time: 32:42 min.]The use printed pick list to pull the items and quantities from stock. Then quantities are entered into system and deliveries are generated.
Once delivery is created, the warehouse personnel enter information on packaging materials and how much each package should hold. That way it ensures appropriate packing and tracks the packing materials used.
Sales Process with Pick and Pack
Picking and Packing is optional in the sales process. If a company manages a large warehouse, and has dedicated personnel the collect the items, pack and ship them, the pick and pack manager can helpful.
The Pick and Pack Manager allows you the flexibility to release some or all items to pick list, perform a partial pick for the items, or pick all items.
Pick and Pack Manager scans Open Sales Orders and Reserve Invoices by requested Delivery date and priority and then presents the available quantities ready to be picked and shipped.
You can view the open line items ready to be picked.
The select the items you want to assign a pick list. Warehouse personnel pick the items from the pick list and enter the quantities picked into the system. Then you create Delivery documents for the picked items. In each delivery document, you enter information on how the items are to packaged. A packing list is created which lists the contents of each package in the Delivery.
Pick and Pack Manager tracks three categories of line items:
These three categories are represented by three drawers in the Pick and Pack Manager:
Open drawer displays items all open items for approved Sales Orders and A/R Invoices.
The process does not select lines from draft documents.
The lines in the Open drawer have not been released, picked or delivered yet. You choose lines from the open drawer and create pick lists to pick the items.
The Released Drawer displays all the pick lists for the lines ready to be picked.
The Picked Drawer displays items that have been picked but are not yet delivered.
In any of the drawers, you can chose the button Deliver to create deliveries for the items and skip the Picked or Released stage.
Open > Released > Picked > Delivery
Imagine some Sales Orders have just been created and saved.
The first step is to open the Pick and Pack manager and select the open items you wish to view.
Pick and Pack Manager gives you the option to use various criteria to narrow down the selection of open item ready to pick. Otherwise, all open line items from approved Sales Order and A/R Reserve Invoices will appear.
Typically you want to view items with approaching delivery dates so that you can pick and pack the items and send them out in a timely manner.
Here is a list of selection criteria you can use to choose the range of line items:
You can then sort the results by delivery date, customer, document number, warehouse and priority.
Open
1. Now a list of line items ready to be released for picking appears in
the Open drawer of the Pick and Pack Manager. These are items that have not been
released, picked or delivered yet. For each line items, you also see a quantity
available to release. This quantity is a cumulative quantity that takes into
account the current stock of the item, and opens orders and reserve
invoices that show on the pick and pack manager. Therefore it is important to
choose appropriate sorting criteria.
You make adjust the quantity to be released, and when you are ready, mark the line items you want to release to a pick list.
Released
2. The items now have the status of Released and will appear in the
Released Drawer. Each item has a column displaying the document number for the
pick list it is on. You can display the data in two views - Detailed or Summary.
The detailed view shows each line item as a row. The Summary view groups the
items unde pick list. Each line item displays a quantity available to pick. The
available to pick column displays the current available quantity for the item in
the warehouse.
In step 3, warehouse personnel use the pick list to physically
pick the items.
Many companies choose to print the pick list so that warehouse personnel can
update the list with quantities picked while physically picking the items from
the shelves. Then once the items are picked, the warehouse personnel open the
pick list in SAP Business One an enter the actual picked quantities.
Picked
4. After the warehouse personnel enter the picked quantities in the
pick list, they choose Update. The items with picked quantities now receive the
status Picked, and of course, the line items now appear in the Drawer Picked.
Deliver
The last step, number 5, is creating a delivery. In the list of the
picked items you can choose the Deliver button to create the Deliveries,
I have chosen his step and the end of the process, however, the process is actually quite flexible and you can create the Deliveries from the open released list, as well as from pick list.
There are several Sales Orders ready to be Delivered today.
We will pick and pack manager in Order to pick and Deliver those urgent Sales Orders.
Inventory > Pick and Pack > Pick and Pack Manager
The selection criteria window opens Pick and Pack. Here you can select Sales Orders by a number of different criteria such as Delivery date, posting date, warehouses and even by customer priority. Since I want pick items that need to be Delivered urgently, I will enter today's date in the From and To Delivery date fields.
Notice that you can also sort the Order item lines. Sorting can be useful so that you can put the highest priority items near the top so that they are released for picking first. (Choose Priority).
I choose the status view Open line items. In the Open drawer so I can view all the items ready for picking that have not yet been released to pick lists and of course have not yet been picked.
Here I can scan the Open Order lines and see the items and the quantities.
The column Avail.to Release shows me if I have enough item quantity in the warehouse.
Notice that if you have the same item number on the list, you will se different quantities listed in the available be release column.
Why is that? That is because the quantity shown in the column shows the quantities available in the warehouse in a cumulative way. In other words, the first line item will show the total quantity in the warehouse. The next time the item appears, it will show the quantity available after the line item above has been picked.
This is why it can be very important to choose sort criteria which prioritizes your open items list.
I select all the Order lines to assign them a pick list. Notice that I receive an error for lines with zero quantities available. I will deselect the lines with zero quantity.
The Pick list allows you to pick partial quantities sp generally this is not a problem.
Now we ready to release the items to the pick list (Choose Release to Pick List)
In the Pick list details window, I will enter today as the pick date, and enter the name of the picker who is being assigned, Jane Smith. I will also enter a Remark "Urgent Orders, Please pick immediately." Choose Add to add the pick list document.
The Sales Order lines selected have now been moved to the Released drawer. The lines with unavailable items remain in the Open drawer.
Now I can switch over to the Released Drawer. Here I see all op[en Sales Order lines which have been released to pick list. These Order lines are now available in the warehouse for picking.
The column Pick Number shows the number of the pick list. This number is generated by the system automatically.
Right now we are viewing the list in the Detailed view. When I switch to the summary view (using the drop down box in the upper right), the changes to a view sorted by pick list.
Now let us imagine that the warehouse team has been alerted that there are some urgent Sales Orders that need to be Picked and Shipped. The warehouse manager prints out pick list to give to Jane smith with a list of items she needs to pick.
To do this, the manager uses the menu path to open Pick List
that was just created:
Inventory > Pick and Pack > Pick List.
He prints the pick list witch is automatically sent to the printer in the warehouse. If you configure the automatic printing of pick list, it will be printed at the time you release the items for the pick list.
Let us take a look at the print preview on the pick list so we can see what format Jane will be using for picking.
I choose the Print Preview icon. Notice that the column Picked is blank. This is sp the picker can fill in the actual quantities picked.
Now let us imagine that Jane has done the picking and marked down the actual quantities on her printed pick list. She has found the full quantity for all the items except two. Jane will use the same path menu to open the pick list and then she enters the actual quantity. Since she found all but two items, she can use the option to Pick All and then amend the few order lines that could not be fulfilled completely.
Now that the actual quantities picked have been entered, Jane updates the pick list.
If the pick list had been fully picked, the status would automatically change to Closed. Instead, the pick list has the status "Partially picked".
Now let us open the pick and pack manager to view what has happened to the items we previously saw in the Release list.
Inventory > Pick and Pack > Pick and Pack Manager. I change Status: Open / Released / Picked
Most of the items have been moved to the Picked drawer. Only the items that could not be picked fully remain in this drawer. The majority of the pick list items are in the Picked drawer. As with the Released drawer, you can group the Sales Order by pick list by changing the view form Detailed to Summary.
Choose OK. We will return later to deliver the picked items.
In our example, I will focus on the delivery as the pack document.
However, packing can also be done in: A/R Invoices.
The first step is to open Packages - Setup window in your packing document. In our case, this is the Delivery.
Step 2 is to enter the packages that you want to use for packing the items of the Delivery.
You can define package types in advance in the Administration setup for inventory or you create new package types directly in the Packaging Setup Window. In the Packages Setup window, you will se a list of Available items. These are the items and quantities that you can pack into packages.
Step 3 is to select the items and enter the quantities that you want to assign to the package selected in the Existing Package list.
The Package Contents are displays the content of the package that is selected in the Existing Packages list above.
The Package list is also printed when a Delivery not is printed.
We have 3 Sales Orders that just been picked and are ready for Delivery.
These items are displayed in the Picked drawer in the Pick and Pack Manager. Since these items go to more customer, more than one Delivery be created. We can see the customer number in the customer Code column.
I select the items I would like to Deliver. I choose Deliver to review the Delivery documents generated.
Once the Delivery is created, I can right-click in the delivery document and select Packaging from the context menu.
The Packages setup window appears.
Notice that the window is divided into 3 sections:
The first section lists existing packages for the Delivery. At this point, none
are set up.
The second section displays available items, items not yet assigned to a
package.
The third section shows packages an their contents. Here you could see items
currently allocated to a package. None exist at this time.
Our fist step is to enter a package type in the fist section. Choose from the list of package types. Select crate.
I highlight the item I would like to pack in the available items area. A quantity of 8 will fit in this crate so I enter 8 in the Selected field and use the arrow button to add the item into the package contents area.
To pack a second crate, I choose Add Row in the top section, then I add another crate.
I repeat this process to pack the full quantity of this item.
If I make a mistake at any time, I can use the reverse arrow tu unpack the items.
When I finish packing, I can choose Update to save the data.
I can print out a copy of the packing list for the Delivery to send to the customer with the shipment.
Then I can save the Delivery by choosing Add.
: III. SALES – A/R > Issues in SalesItem Master Data, Inventory Data tab
Document Settings, General Tab
Set the response to release of inventory below minimum
level:
- Without warning
- Warning only
- Block Release
You can set a minimum quantity for items in Inventory in the
Item Master Record. Then can control how the system reacts when picking or
Delivery will cause the Inventory to fall below the minimum. The response to
Release of Inventory Below the Minimum Level setting has 3 options:
- Without Warning - this is the default setting, the system does nothing.
- Warning Only - Select this option to receive a warning message. In this case
the user can choose whether to continue (and fall below minimum level), or to
make the required adjustment first, such as issuing only a partial quantity,
choosing another warehouse or substituting another item.
- Block Release - Select this option to receive an error message that prevents
the user from completing the document and falling below the minimum level
defined for the item.
You selection applies on the following scenarios:
- When creating Delivery
- When releasing items to pick list from the Open drawer
- When updating the Released quantity in the Pick and Pack Manager Window.
Defining package types used for packing:
- Administration > Setup > Inventory
- Inside packaging window, Define New
New package types can be created in two places:
- Administration > Setup > Inventory
- Package Setup Window
This makes it easy to not only set up packages in advance, but also to introduce a new package type when it is first used for packing.
Demo - Settings that affect Picking and Packing
One of the key settings that affects picking, centers on how available is determinind when you set a minimum level on inventory.
First let me set a minimum level for inventory for one of my products.
Inventory > Item Master. The I choose the Inventory Data tab.
First notice the checkbox that controls whether an item's inventory is managed at the company or warehouse level. Since the box is checked, this item's inventory is controlled at the warehouse level.
Notice that the fields for minimum and maximum inventory are open to entry for each warehouse. We can see that the current inventory in the main warehouse is currently 10. I will now set 6 as the minimum quantity for this item in the main warehouse. I will update and Save item.
Now we will take a look at how we can control how the system reacts when an item dips below the Minimum Inventory Level.
Administration > Initialization > Document Settings. General tab.
See the setting for the Response for Release for Inventory Outside the Defined Range. If you running an earlier version, you may also see this setting titled, Response for Release Below Minimum Inventory Level. Basically this settings allows you define a system response even the inventory falls below the Minimum Inventory Level that you have defined.
There are three choices:
- Without Warning, then the system does nothing if you want to pick or Deliver
quantities which cause inventory to go below the minimum.
- Warning Only, then the system will give a warning if you are about to go below Minimum Inventory but users can override the warning to pick the items and Deliver the items
- Block Release, then the system will not allow you to go below the minimum
inventory.
I will chose Block Release so we can see how this will affect out ability to release items to pick list.
If you use the setting for Warning Only or Block Release, you should also set the system to not Allow Negative Inventory. Negative inventory is when the stock for an item goes below zero. Previously, you had a checkbox for this setting. However it has been enhanced and gives more control on how negative inventory is determined.
The option "Company" means that the system will consider all the stock in all the warehouse when determining if a goods movement will cause the stock to go negative. In other words, even if my warehouse has only 1 item, if another warehouse has 200, I will have enough inventory to issue a quantity of 5.
The option "Warehouse" means that the system considers only the stock in the pertinent warehouse.
The option "Item Settings" is useful if you want to have the flexibility to choose at the item level how negative inventory is determined. The system looks at whether you have marked the checkbox "Maintain Inventory at the Warehouse Level".
I choose Warehouse. Now that I have marked Block Release for items below minimum inventory and I have set the system to disallow negative inventory at the warehouse level, I will save my settings.
Since there are only 10 in stock, and I've set the minimum inventory to 6, there is only a quantity of 4 considered available. Because of my document settings, the system will block me from either creating a delivery or releasing this item to pick list.
This is leave the inventory at only 5 which is below the minimum required inventory.
I would like to point out a new field on the Logistics tab which allows you enter a remark that will appear in the Pick and Pack Manager (Enter the remark: Please pick immediately).
Then I open pick and pack manager (Inventory > Pick and Pack > Pick and Pack Manager).
I see the Sales Order item line in the Open drawer with a quantity of 5. When I choose Release to List I get an error message because the inventory quantity is below the minimum level.
Unfortunately, I won't be able to pick this order immediately due to the minimum level of inventory required.
Now we will take a look at the set up for new package types.
When setting up your inventory system initially, you will probably use the menu path:
Administration > Setup > Inventory > Package Types to set up multiple packages at once. SAP Business One also gives you the flexibility to define a new package type during packing.
We ar delivering the I00003 flash drives using a new type of 10-pack. I can open delivery, enter the customer and the item. Then I click to open context menu and I choose Packaging. Then in the top section of the Packages - Setup window, I select the Type field. If the list of package window, I can choose New to create a new package type. I enter 10-pack and then choose OK.
[Time: 43:35 min.]Describe how to setup pricing option in SAP Business One:
Periodically you give discounts on the list price based on volume purchases or during sales events
Businesses have needs for flexibility in pricing. Different customers receive different prices based on the circumstances of the sale. For example, a one-time customer pays a higher price than a regular customer or one of your resellers.
Similarly a customer buying a larger volume will get a better price than a customer buying only one.
Internet customers set a lower price than customer who need customer service in a store environment.
That is why SAP Business One has several ways to handle pricing.
Let us look at some of the different tools available to set up pricing.
We have Price Lists, Period and Volume Discounts, Discount Groups and Special Prices for Business Partners.
The first and most basic way of pricing is Price Lists. You can set up Price Lists for different groups of customers. On each Price List you can enter price for each item. Then when a Business Partner who belong to that Price List buys an item, they get the right price for their customer group.
A basic price for the product may not be enough.
You may want to set to set up sale prices for a limited time period. You may want to give a discount when a customer buys in volume. For Price Lists, you can discounts based on percentages or quantities.
Period and Volume Discounts allow you to define discounts by dates and based on volume based on an existing Price List. The discounts entered here will override the basic price in the Business Partner's assigned Price List.
Discount Groups You can add discounts based on Item Group, properties, and manufacturer. These types of prices are called discount groups.
If a Sales Order line item is relevant for a Discount Group price, then that price will override a price based on a period or volume discount or Price List price.
Special Prices. Some times you want to give an even better deal to your favorite customers. You can base your discounts on any price list, or simply enter them manually.
You can define discounts by date range an quantities. Special Prices override all other prices.
You will notice that the four types of prices range from the most general "Price Lists" to the most specific "Special Prices for Business Partners".
When the system searches for a price, it look for the most specific Type of Price first.
So, that means it starts with the types of prices listed in the opposite order of how they have been introduced on this slide.
The system starts looking for a Special Price for that Business Partner.
If no Special Price exists for that Business Partner, it looks for Discount Groups.
If no Discount Group applies, it looks for Period and Volume Discounts.
If no Period and Volume discount, it uses the Price List assigned to the Business Partner to find the price.
Let us start by looking at Price List in detail.
SAP Business One provides you with 10 Price Lists and you can create more.
Different Price List are required for the items in the system in order to take account of the following. You want to offer customers that make regular purchases from you or who purchase large quantities a lower price than customers who only occasional purchases or purchase small quantities of an item. Pricing could also be based on the size of a customer.
Every item in your sistem is linked to every Price List. In fact when you look in the item master, you will see that you can view prices for multiple Price Lists directly in the item master.
You can assign prices for the item in all but two of the price
lists. Two of the default lists are maintained by the system and cannot be
maintained by users:
Last Evaluated Price and
Last Purchase Price
However, even though it is possible, you may not wish to maintain pricing for the other Price Lists directly in the item master because this overrides automatic pricing in a Price List.
I will set a Price List for an item in 2 Price Lists. First let's take a look at the item master.
The item is a Monitor and currently there are no price assigned for the item. You can acces all the Price Lists and view pricing from within the item master. Choose Price List dropdown. I can also maintain item prices for the specified Price Lists in the Item Master Record by changing the dropdown in the field Price List to each Price List needed.
I will set the Base Price for item to 150.
The disadvantage of maintaining prices directly in the item master is that some Price Lists may be automatically calculated and entering a manual price could override the automatic calculation. In this case, the base Price List in our example is a manually maintained base list and is used other Price Lists as the base price is for their calculation.
Let us look at our Price Lists and see how you can enter a price directly into a Price List.
Inventory > Price List > Price List. We see all the Price List and can choose among them.
I can open the Base Price List by double-clicking on the number. All Price Lists contains all items. I enter T in the Find field and the system brings me to all items beginning with T. Here see the monitor and the price I entered directly in the item.
Now I will double-click on the Small Accounts Sales Price Price List an enter a price for that same item.
Notice that the item automatically appears on the Price List even though I have not given that item a Price List for this Price List yet. Notice the price is higher than the base price I entered for the item.
I I look to the right at the Price List details, I can see why. The Small Account Sales Price is based on a factor 1.75 therefore it will be automatically set to 175% higher than base price.
If I go back inside the Price List, I can manually set a different price if I like. Notice how it automatically marks the Manual checkbox on the right.
We will discuss the options in the Price Lists in more detail in upcoming slides and demos.
As we saw, prices are defined for items in Price Lists.
You assign a Price List to each Business Partner. A
Business
Partner is assigned to only one Price List. When you define a set of payment
terms, you link a Price List. The Price List linked to the payments terms
defaults into the Business Partner Master when you assign Payment Terms to that
Business Partner. You can change the defaulted Price List in the Business
Partner Master.
The Price List assigned to the Business Partner defaults into
Marketing Documents when the Business Partner is assigned.
You can override the assigned Price List in the document either by changing it directly or by changing the Payment Terms. If you change the Payment Terms, the system will prompt you to ask if you want to change the Price List or not.
When you create a Marketing Document, the system brings in the Price List associated with the Business Partner at the header of the document.
You can see the Price List in the Form Settings of the document. Then the system proposes the item price defined in the Price List associated with that Business Partner.
Demo - Price Lists in the Sales Process
We have a new customer, Smith Incorporated, who we expect will only order small quantities. In the Customer Master Data, I will assign him the Small Accounts Price List.
Business Partners > Business Partner Master Data
I will select the Price List Small Account Sales Price on the Payment Terms tab
page.
Now I will create a Sales Order for customer C24500 and item T2002.
We see that the system selects the price we had entered into the Price List in the previous demo.
In the Price List window, you see all the Price Lists. One nice feature of this window is that you can set automatic pricing for price lists.
When you base a Price List on another Price List, you tell the system how to calculate the prices in the factor column. For example, if you want to double the price from the original Price List, the factor would be 2.0
/we can see the Large customer list has a factor of 1.5 over the Purchasing Price List. That means that if an item is 10$ in the Purchase Price List, then large customer list would have that same item at 15$.
From this screen, you can update an entire Price List of filter the items by various criteria such as Item Group, vendor or so on.
Inventory > Price Lists > Price Lists
You can double-click a row to open the Price List and maintain the individual item prices. Once you open Price List, you see all the items in the system and the prices assigned.
Here we see the Large Customer Price List is based on the Purchasing Price List.
The prices are calculated using a factor of 2. Notice that the table currently has an automatic price calculation of 1600.
If we change the price for the table manually, then manual checkbox is automatically flagged. Once a price is maintained manually, it will not be update automatically from that point forward. It is also possible to select the manual checkbox without changing the price. This way the price will remain as it is, no matter if the base price changes. If we decide to include this item in the automatic update for the future, we need to deactivate this indicator.
Inventory > Price Lists > Price Lists
SAP Business One delivers 10 Price Lists.
You can adjust the delivered Price List for you business needs.
Additionally you can add new Price Lists or you can remove unused Price Lists.
You can also change the name of Price List.
You can link Price Lists to on of the 4 autorization groups, to control user access to viewing, updating an using certain Price Lists.
Notice the factor column. The factor column allows you to base Price Lists prices on another Price List. For example, you can set up a base Price List and have all other Price Lists based on this Price List. If you put a factor of 2 then system takes the prices in the base Price List and multiplies them by 2 for your new Price List. This is a fast and easy way to set prices for a Price List.
When the base price changes, all the prices linked to it, are adjusted based on the current factor.
The radio buttons allow you to update an entire Price List or update by selection. If you choose to update by selection, you can select which prices to update based on criteria such as item code, vendor, Item Group or item properties.
If you want to remove a Price List, choose the Price List name, and right-click to open the context menu. Then you would choose Delete Row.
To create a new Price List, place your cursor on the row number and Right mouse click > Add Row. You can give the new Price List any name you like. We will call it Large Accounts Sales Price. The base Price List is Base Price and the factor is 2. Save the Price List by choosing Update. To see the result, I double-click on the Price List. All the prices have the same factor.
Now what if I decide that a factor of 2 is too high? I can change the factor and update entire Price List or I could decide that a factor of two is OK for most items, but that items in the Item Group of X should be 1.5. In this case, I can update by selection and choose the Item Group whose prices I would like to change.
Last Purchase Price - Price List
Last Purchase Price is automatically updated when an item enters inventory with its original price. Last Purchase Price is updated by: accounts payable invoices, Goods Receipt and Goods Receipt POs. Inventory Posting for initial quantities or adjustments for positive Stock differences, Landed Costs documents and automatic calculation of Last Purchase Price for Bills of Materials used in production.
If none of these actions listed in the graphic have been performed in the system for an item, the Last Purchase Price Price List will not contain a price for the item. You can base other Price Lists on the Purchase Price - price.
You cannot, however, change the price in the Last Purchase Price Price List manually.
We have a new item that we will be reselling. Let us take a quick look at the Item Master Record.
Notice that ho price is listed yet. So, we can assume although this product will appear on every Price List, it will not yet have any price in the system.
Inventory > Price Lists > Price Lists
Open the base Price List and the Last Purchase Price List. There is currently no Price Listed for T2003 in any Price List.
Imagine that I have ordered a quantity of 10 for this item from a vendor by phone. The items have arrived with an invoice showing a purchase price of 100. So now, I can post the A/P Invoice to receive the items into stock and trigger the payment to the vendor.
Purchasing > A/P Invoice
Once an invoice is posted, an entry is made in the last Purchase Price List.
Inventory > Price Lists > Price Lists
We look at the Last Purchase Price List and see that the price has been updated.
You can use period and volume discounts to define Special Prices for Price Lists.
A Special Price can apply to a defined period or to a quantity scale. For example, you decide to have a fall sale on chairs. You want to give a 5% discount off of the price on the low volume Price List for the month of September. During that period will also give an additional discount for anyone who buys a set of 4 chairs or more.
In SAP Business One, time-based discounts are set up first then volume discounts are defined for those validity periods.
When a marketing document uses this Price List, the Business Partner will receive the period and volume discounts.
? Demo - Period and Volume Discounts
A Price List contains basic prices, but sometimes there are sales that affect our Price List items. We are having a big sale on all our scanners. This sale will be valid through next month. And for certain items we will be giving a 5% discount if the customer buys 4 or more.
Inventory > Price Lists > Period and Volume Discount": Small Account Sales Price.
Select the Items with Copy Special Prices to Selection Criteria ?
I set the date from through the end of next month. [Double click to Period Discounts line] and I set a volume discount for buying 4 then getting 5% discount.
Now I will create a Sales Order to test this pricing.
See that the price appear in blue. This is true for any pricing that that is not purely based on a Price List.
If I decide to extend this sale to other Item Groups, I can copy it (Copy by Selection Criteria)
These discount are defined by:
- an Item Group
- a combination of Item Group properties or
- an Item Manufacturer
When you use Discount Groups at the properties level, SAP Business One allows you to define for several properties.
You can use a rule to decide which discount is used by system
for the calculation:
- The highest discount - The properties with the highest discount will determine
the overall discount calculated for the item.
A big advantage is using Discount Groups is when you create new items, they are automatically included any Discount Groups that apply.
For example, let us say you have a Discount Group for products assigned to the Item Group for scanners. Any time you create item and assign it to the Item Group for scanners, it will automatically belong to the discount group for scanners.
I want to grant two of my customers a special discount of 10% for items for imaging equipment, such as scanners, cameras, faxes and printers. I also want to give the discount of 5% for any other profesional items, excluding imaging equipment.
Inventory > Price List > Special Prices > Discount Groups
Choose customer C20000 and select the tab Item Properties. For the item Property Imaging Equipment, create a 10% discount. For the property Office and Professional, I will create a 5% discount.
When the order includes an item that belongs to both item properties, then I want them to get the Highest Discount possible. Other options: Lowest Discount, Highest Discount, Average Discount, Discount Totals.
I will extend this same discount to second customer by choosing the button Copy to Selection Criteria. In the selection field, I enter customer C42000 (in the From and To fields). Then choose OK and Add.
Now we can test the pricing in Sales Order: Sales A/R > Sales Order.
We will take a look at the Item Master Record to view the properties.
Special Prices for Business Partners
For a specific Business Partner > Special Prices for
selected items of Business Partener:
- With or without reference to a Price List
- Discount calculation
- Automatic update when Price List are updates
Special Prices for Business Partners enable you to give a discount or surcharge for a specific Business Partner.
The Special Price are very flexible.
You can create a Special Price with or without reference to a Price List, and it
does not even have to be the Price List associated with the customer.
You can even set the Special Price to be updated and recalculated when the Price List it references is updated.
Just like Price List, Special Prices for Business Partners can have period and volume discounts. You double-click on the Special Price to open up fields to enter dates for when the price is valid.
When you double-click a second time, you can then define a volume discount for the validity period you just defined.
Once you have defined a Special Price for one item, you can choose copy discounts to copy the date range and percentages for other items selected for that Business Partner.
One nice feature of Special Prices is that once you set up a
Special Price, you can copy that price to other Business Partners. For copying
Special Prices from one Business Partner to other the following copy rules
exist.
Replace all Items: the system copies all the Special Prices and possibly
overwrite existing ones.
Replace Only Existing Items: The system overwrites all the Special Prices that
exist in the source Business Partner (BP) and target BP records.
It does not add any new Special Prices.
Do Not Replace Items: The system adds new Special Prices, but does not change
existing ones.
We have agreed on a special customer discount of 10% of the store price from the large Account Sales Price Price List for the item C00008 with customer Parameter Technology.
Inventory > Price List > Special Prices > Special Prices for Business Partners
Add item C00005 to the Special Prices for Business Partners. I select the row containing item C00005 and double click to display a time interval.
I enter today's date in the Valid Until field.
In the Special Prices Volume Discount window, I can enter a quantity-based discount (5% discount as of 2 units, 10% as 5 units).
Now I will create a Sales Order for 5 units of each item to check that the proces are correct.
After lengthy negotiations, we agree to grant another customer Microchips the same conditions for items C00005 through C00008. It is to copy Special Price to one or more Business Partners.
Inventory > Price Lists > Special Prices > Copy Special Prices to Selection Criteria.
A header level, I enter the Business Partner from whom you want to copy the Special Prices (C23900) and choose a selection of parameters to whom you want to copy the Special Price (C30000 in the From and To fields). Items: Code From c00005 To C00008, radio-button: Replace All Items.
Price Determination in SAP Business One
Since you can define several prices in the system for the same item, the system needs to use a certain logic to find the valid price, starting with the most specific price. The system uses the above list of priorities to find the valid price. Once it has found the price, it enters the result in the document.
First, the system looks for a Business Partner and item
specific Special Price.
If none exists, then it looks for Discount Group.
If no discount Group Exists, then it looks for period and volume discounts for
the selected Price List.
If no Period and Volume Discounts exists for the Price List, then it users the
basic Price List.